Congratulations, you’ve landed a new Google Ads account! You’ve closed the sale and are ready to dig in.
Your very first step for cleaning up after a Google Ads account takeover should be a thorough audit of the account.
Perhaps you even performed a quick audit during the sales process, if the client was kind enough to give you access.
Realistically, though, most clients will restrict access until the contract with the new agency is signed. Your first day or two on the new account should absolutely be spent in an in-depth audit.
After all, there’s a reason the client changed agencies.
Let’s break down 10 tips for cleaning up after a Google Ads account takeover.
1. Review Billing & Account Access First
You may be tempted to jump into account structure and settings right away – but resist that temptation.
Advertisement
Continue Reading Below
It’s crucial to ensure that billing settings are accurate and that no one has access to the account who shouldn’t.
It never fails to surprise me how many of our new accounts still have users with access from two and even three agencies ago. And I know we still have access to a handful of accounts that haven’t been clients for years.
Clean this up immediately. The last thing you want is to have to deal with your predecessor on billing or performance issues.
2. Review Account & Campaign Settings
Account and campaign settings are where a Google Ads takeover can go quickly awry.
You’d be surprised at how many PPC managers ignore these high-level settings or forget to adjust them.
First, check account settings. This is where you control things like auto-tagging, tracking templates, and brand safety measures such as sensitive content.
For most accounts, auto-tagging should be turned on. Check with your client, but it’s rare to turn off auto-tagging, even if the client isn’t using Google Analytics.
Advertisement
Continue Reading Below
Carefully review the Inventory Type and Excluded Content sections, especially if you use a lot of Google Display Network or YouTube ads.
Make sure you’re excluding any content types that could be harmful to your brand.
Ad suggestions are another key area to review.
If you haven’t selected Set for review – will not auto-apply, Google will automatically launch new ads they’ve created for your account, even before you and your client have had the chance to review and approve them.
As you can imagine, launching unapproved ads can cause issues, especially if ads need to be reviewed by your client’s legal department.
There have been reports of this setting mysteriously turning on, so don’t skip this step!
Next, review your campaign settings. I like to use Google Ads Editor for this task, but you can also use the Google Ads UI:
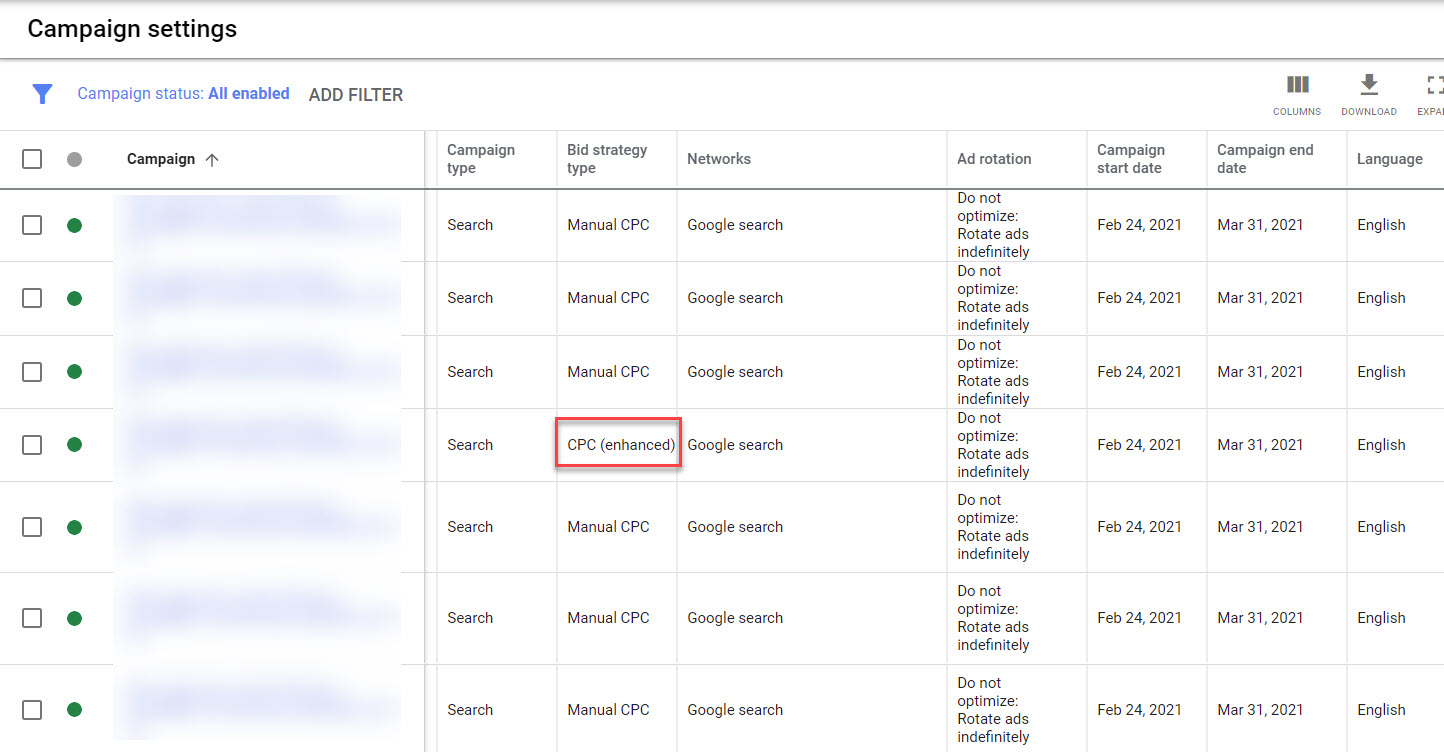
Check to see that all your campaigns have the same settings. In this example, I found one campaign using enhanced CPC, while the rest are using manual CPC.
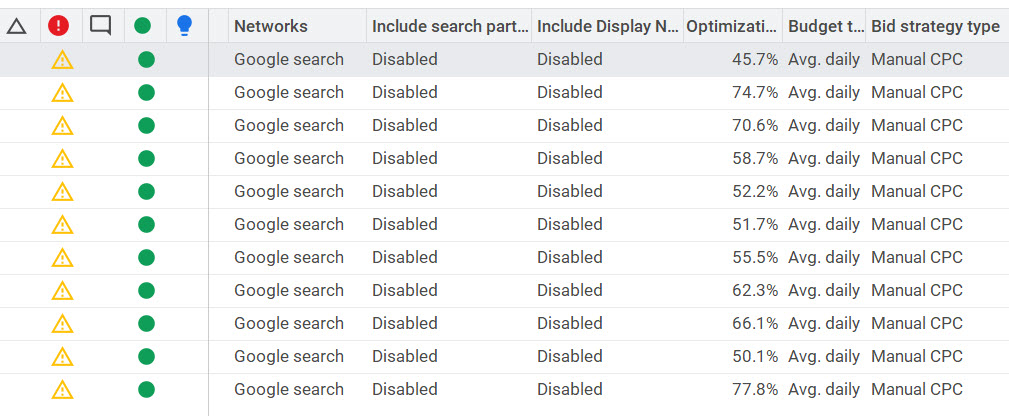
Is that intentional, or just an oversight? There are instances where you’ll want different settings based on campaign objectives, but make sure it’s not just a mistake.
It’s easy to see campaign settings and spot outliers using Google Ads Editor:
3. Review Match Type Distribution
Reviewing match types is a good way to understand how an account is targeting keywords. Are they using a lot of regular broad match, or all exact match? And if so, is the choice logical, or does it look like an oversight?
Advertisement
Continue Reading Below
We recently took over an account that was bidding on broad match terms like “rfp.” Needless to say, they were getting a lot of very untargeted traffic.
Similarly, limiting the account to exact match is rarely the right strategy.
Look at the keywords and see what percentage of keywords fall into each match type. I like to use Editor for this as well.
First, take note of how many active keywords you have, in the left menu:
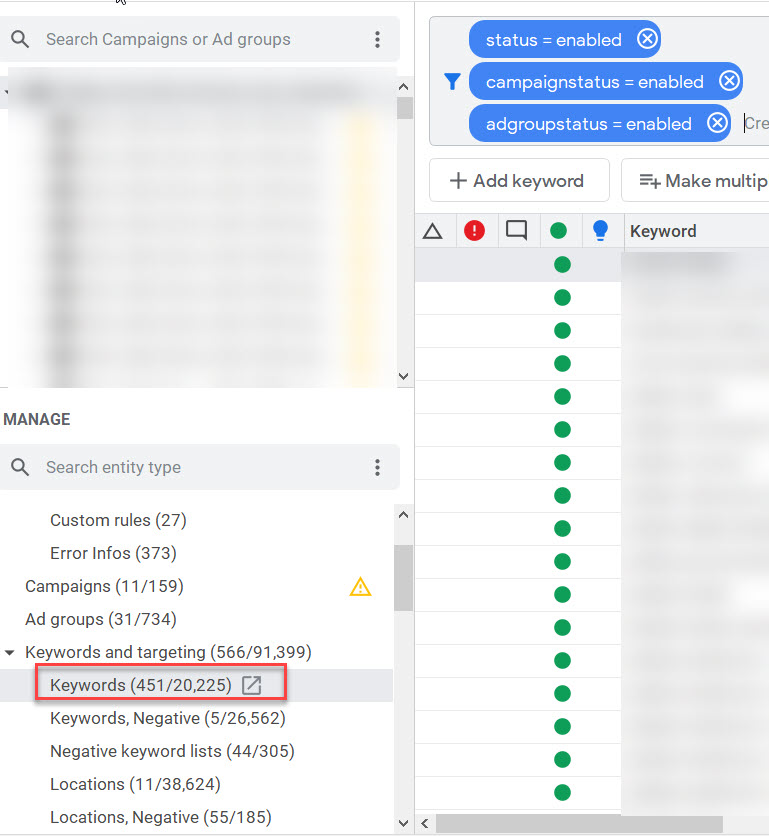
In this example, there are 451 active keywords.
Advertisement
Continue Reading Below
Next, create a filter for active keywords by match type:
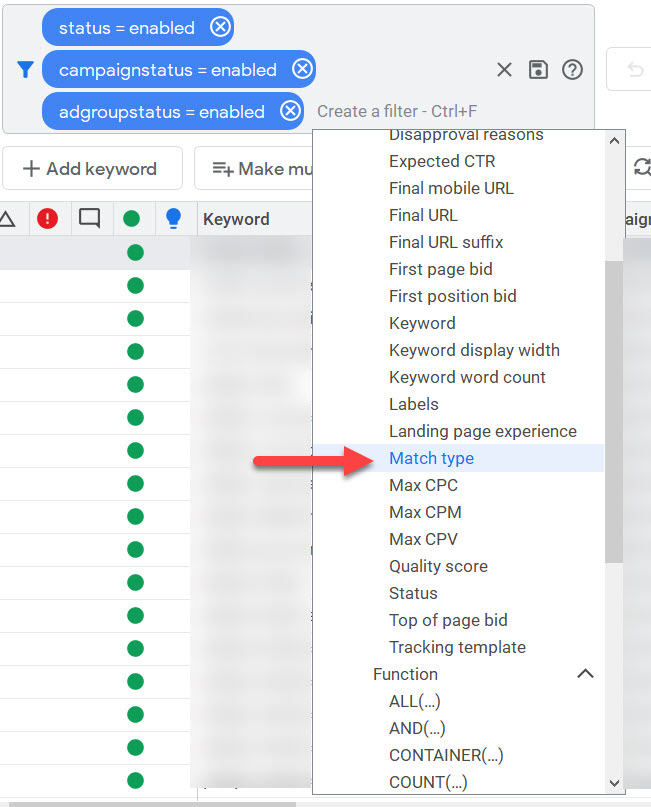
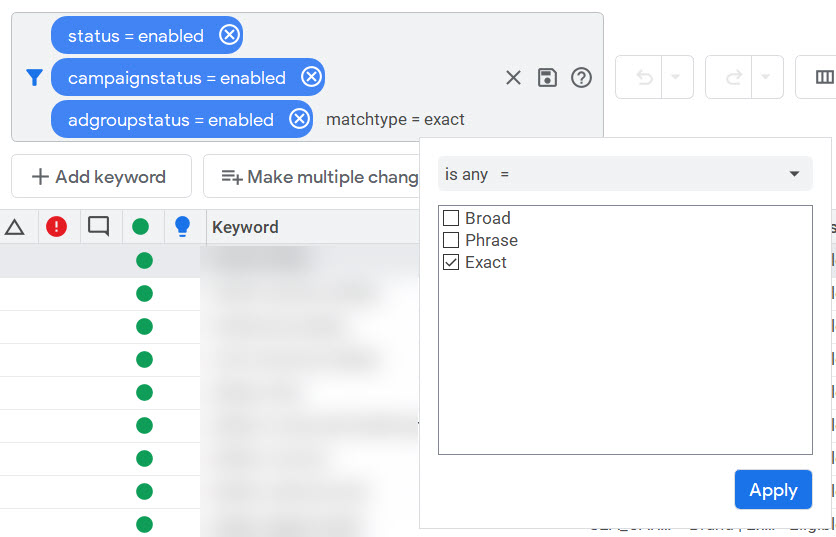
Then check the left menu again:
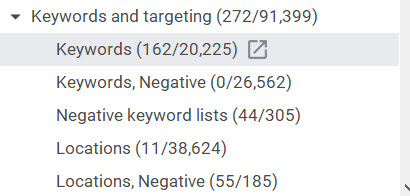
In this example, there are 162 out of 451 keywords that are exact match, or 36%.
You’ll also want to develop a plan to switch any modified broad match keywords to phrase match, since modified broad match is going away.
4. Review Keyword Quality Scores
Inheriting an account full of keywords with a quality score of 7 or higher is a lot different from inheriting one with quality scores all below 3.
Advertisement
Continue Reading Below
Use Google Ads Editor to find out what percentage of keywords have a quality score of 6 or higher vs. below 6.
To do this, use your filters again, this time filtering for quality score:
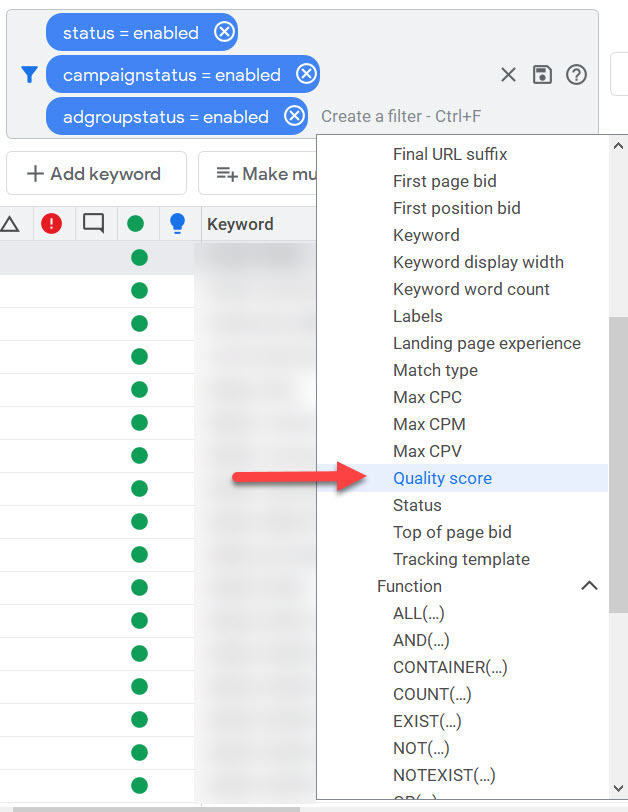
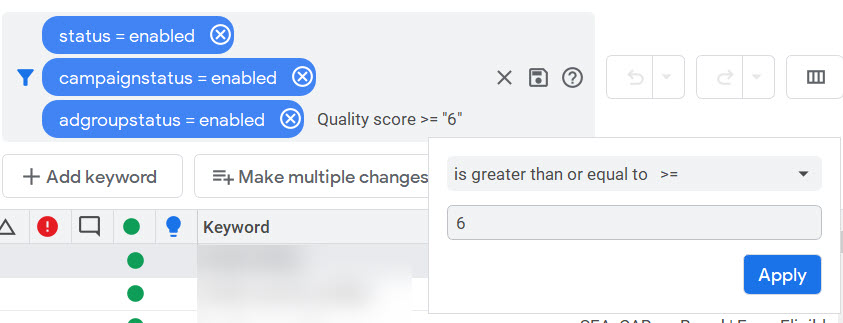
Look for how many keywords are greater than or equal to 6 vs. how many are below.
A note about quality score: Some industries have a tougher time getting high-quality scores than others.
Advertisement
Continue Reading Below
5. Check the Number of Keywords Per Ad Group
You’d think that by now, PPC advertisers know that small, tightly themed ad groups are a best practice.
You would be wrong.
We recently inherited an account with 283 keywords in a single ad group.
Yes, this still happens.
That’s an extreme example, but it’s a good idea to analyze the average number of keywords in an ad group. Using Editor, this is easy:
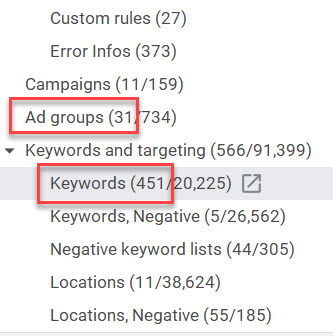
Simply divide the number of keywords by the number of ad groups. In this example, it’s 451/31, or 14.5.
Advertisement
Continue Reading Below
The sweet spot is 15-20 keywords per ad group, but of course, there are exceptions to this.
While single keyword ad groups (SKAGs) sometimes make sense, their use should be rare given the way match types work nowadays. But there are still reasons to use them.
There might be reasons to have larger ad groups, too, although an account can usually benefit from splitting them up. Use your judgment.
6. Check How Many Ads Per Ad Group
This tip might be controversial, but I’m a fan of using no more than three ad variations per ad group.
I know Google likes to recommend using up to nine ads at a time, but I’ve seen performance hurt by that tactic.
I’d rather test two or three ads, find a winner, and then rotate in a new ad.
Regardless of your tactics, it’s good to know how many ads are in an ad group.

Here, the average is 2.9 – right in the sweet spot.
Advertisement
Continue Reading Below
7. Review Audiences and Remarketing Lists
Here, you’ll want to look in two places: Audiences in Google Ads, and Targeting in Editor.
First, check your Remarketing audiences in Google Ads:
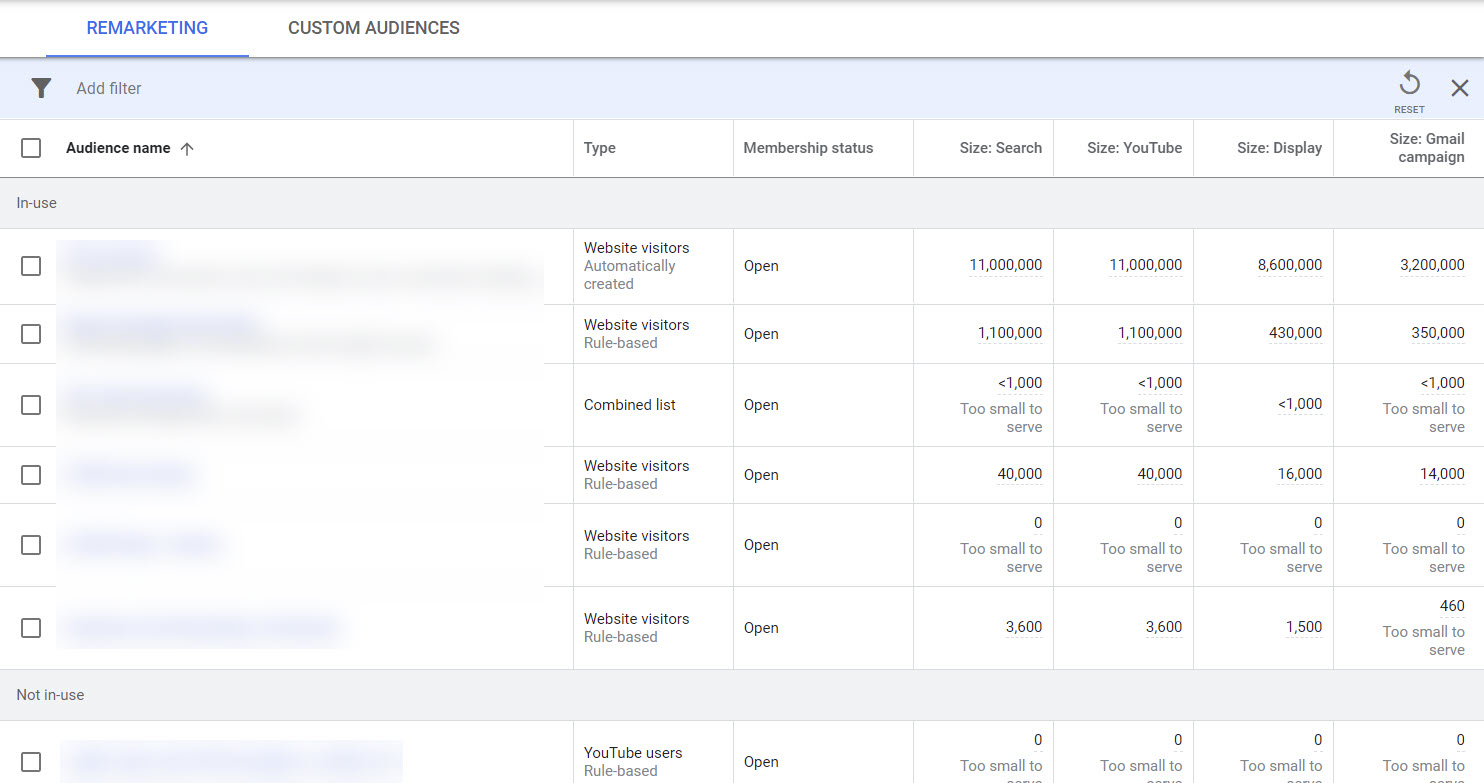
Focus on the in-use audiences first. In this example, there is one audience in use that has 0 members.
Why is that? Is it okay, or is a campaign depending on this audience? Dig in and see what’s going on.
Advertisement
Continue Reading Below
Then look at Custom Audiences with the same lens.
Now, go to Editor and look at the audiences that are applied to ad groups or campaigns:
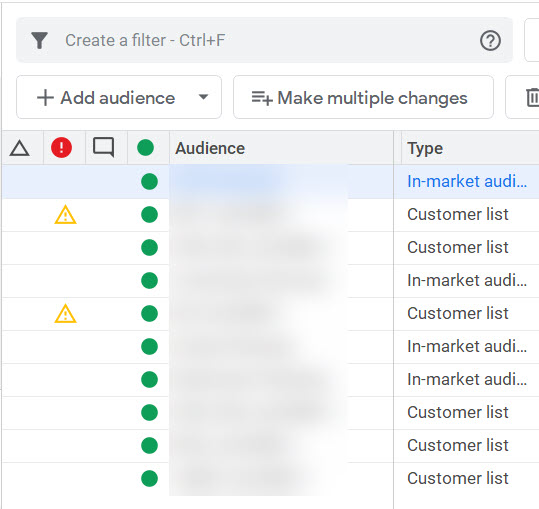
Check the type of audience (in-market, retargeting, customer list), the bid adjustment, and the target settings:
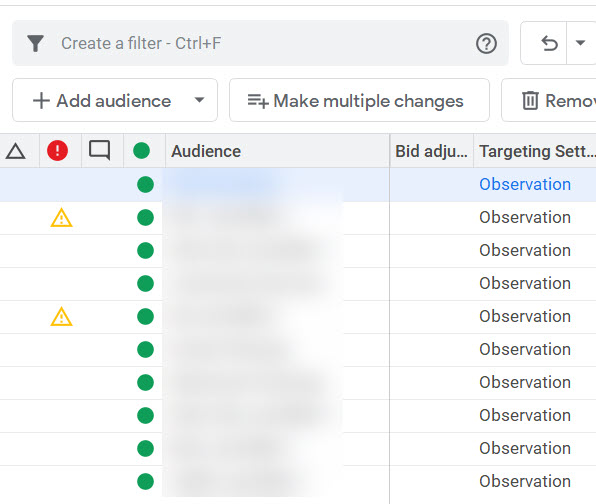
Do they all make sense?
Is an audience targeted for Observation when it should be set to Targeting or vice versa?
Are bid adjustments appropriate for performance?
Advertisement
Continue Reading Below
Note anything that needs to be altered.
8. Audit Tracking Codes on the Website
It’s a good idea to audit the website to make sure the correct tracking codes are installed. You’ll probably need to enlist a developer’s help here.
If you’re using Google Ads conversion tracking, ensure that the codes are installed correctly. You might want to audit codes for other channels, too.
But at a minimum, make sure the Google Ads codes are working the way they should.
During the audit, also check for tracking from any old bid management platforms that might be lingering such as Marin, Kenshoo, or SA360.
Be sure to update to whatever you’re currently using.
9. Review Naming Conventions and Labels
Naming conventions are crucial for keeping a PPC manager’s sanity. In accounts with more than a few campaigns, you’ll want naming conventions that help you sort and filter quickly.
Many large accounts already have a naming convention established. Review it and make sure it makes sense – you might need to revise it or fix any names that weren’t applied correctly.
Advertisement
Continue Reading Below
If you need to establish a naming convention, this article is helpful.
Also, review any labels in the account. Labels are also helpful for filtering and reporting and can go beyond a naming convention.
Look at the Shared Library in Editor at what’s already there:

This example has common labels: Non Brand, Brand, RLSA. You’ll probably have other client-specific labels you’ll want to use, too.
Advertisement
Continue Reading Below
10. Develop a List of Quick Wins for Your Client
Once you’ve gone through the first nine steps, summarize your findings into a “quick wins” document you can share with your client.
We use a simple spreadsheet:

Starting with the positives, what’s right in the account, is a good way to reassure your client. Every account has something good you can say.
Focusing on positives first shows that you’re not trying to point fingers at their previous agency or account manager.
Advertisement
Continue Reading Below
We like to divide up recommendations into “improvement needed” and “low hanging fruit.” Low-hanging fruit includes quick fixes, usually related to settings or tools like bid management and optimization software like Optmyzr or Adalysis.
“Improvement needed” might include things like building new ad copy or audiences or establishing a naming convention.
It’s a good idea to establish a time frame for implementation, too. Be realistic and set reasonable expectations for when the work can be done and who needs to be involved.
That’s it! You’ve crushed it!
Following these 10 tips will set you up for success as you embark on cleaning up after a Google Ads account takeover.
More Resources:
Image Credits
All screenshots taken by author, April 2021


